Keywords: Heat shrink tubing, Thermal analysis, Mechanical property, DMA, Dimension change, Shrinkage
TA446
Introduction
Heat-shrink tubing was invented by Raychem Corporation in 1962. It is manufactured from thermoplastic materials such as polyolefins, fluoropolymers (e.g. FEP, PTFE or Kynar®), PVC, neoprene, silicone elastomer or Viton®. When applying heat to the tubing, especially when the heating temperature is above the glass transition of the polymer, the tube will undergo significant shrinkage, which achieves a successful wrapping around electrical wires. There are some ASTM standards [1,2], that describe methods to quantify the thermal shrinkage.
The amount of shrinkage can be quantitatively evaluated using a Dynamic Mechanical Analyzer (DMA). This application note will introduce two test methods, the iso-strain temperature ramp and iso-force temperature ramp, which can quantitatively measure the shrinking force and dimension change, respectively.

Experimental Setup
A generic commercial heat shrink tube was purchased from an electronic store. The sample is cut and measured in the cross direction, as illustrated below.
A TA Instruments RSA G2 dynamic mechanical analyzer, which is equipped with a forced convection oven (FCO) and a film/fiber tension clamp are used for the measurements. The RSA G2 tensile testing is capable of handling very short sample specimens.
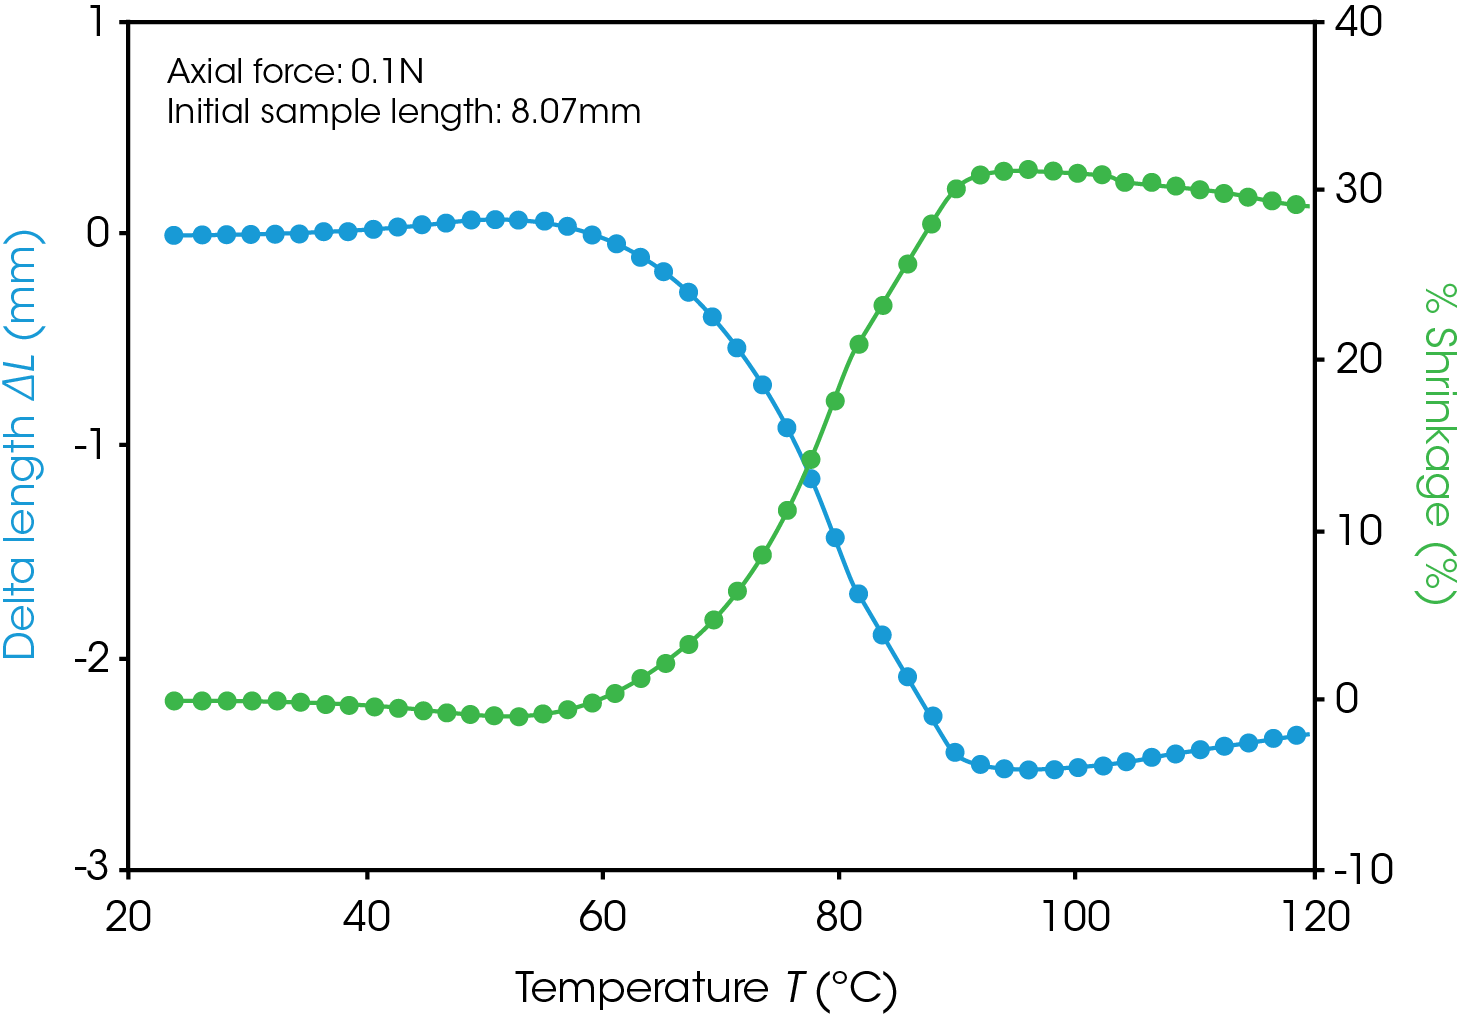
The tube dimension shrinkage is measured using an iso-force temperature ramp method. The sample is cut into a rectangular strip in the cross direction and loaded onto the film tension clamp. A constant force of 0.1N is applied to the sample during a heating test from 25 °C to 120 °C with a heating rate of 3 °C/min. During the test, sample length change is recorded as a function of temperature.
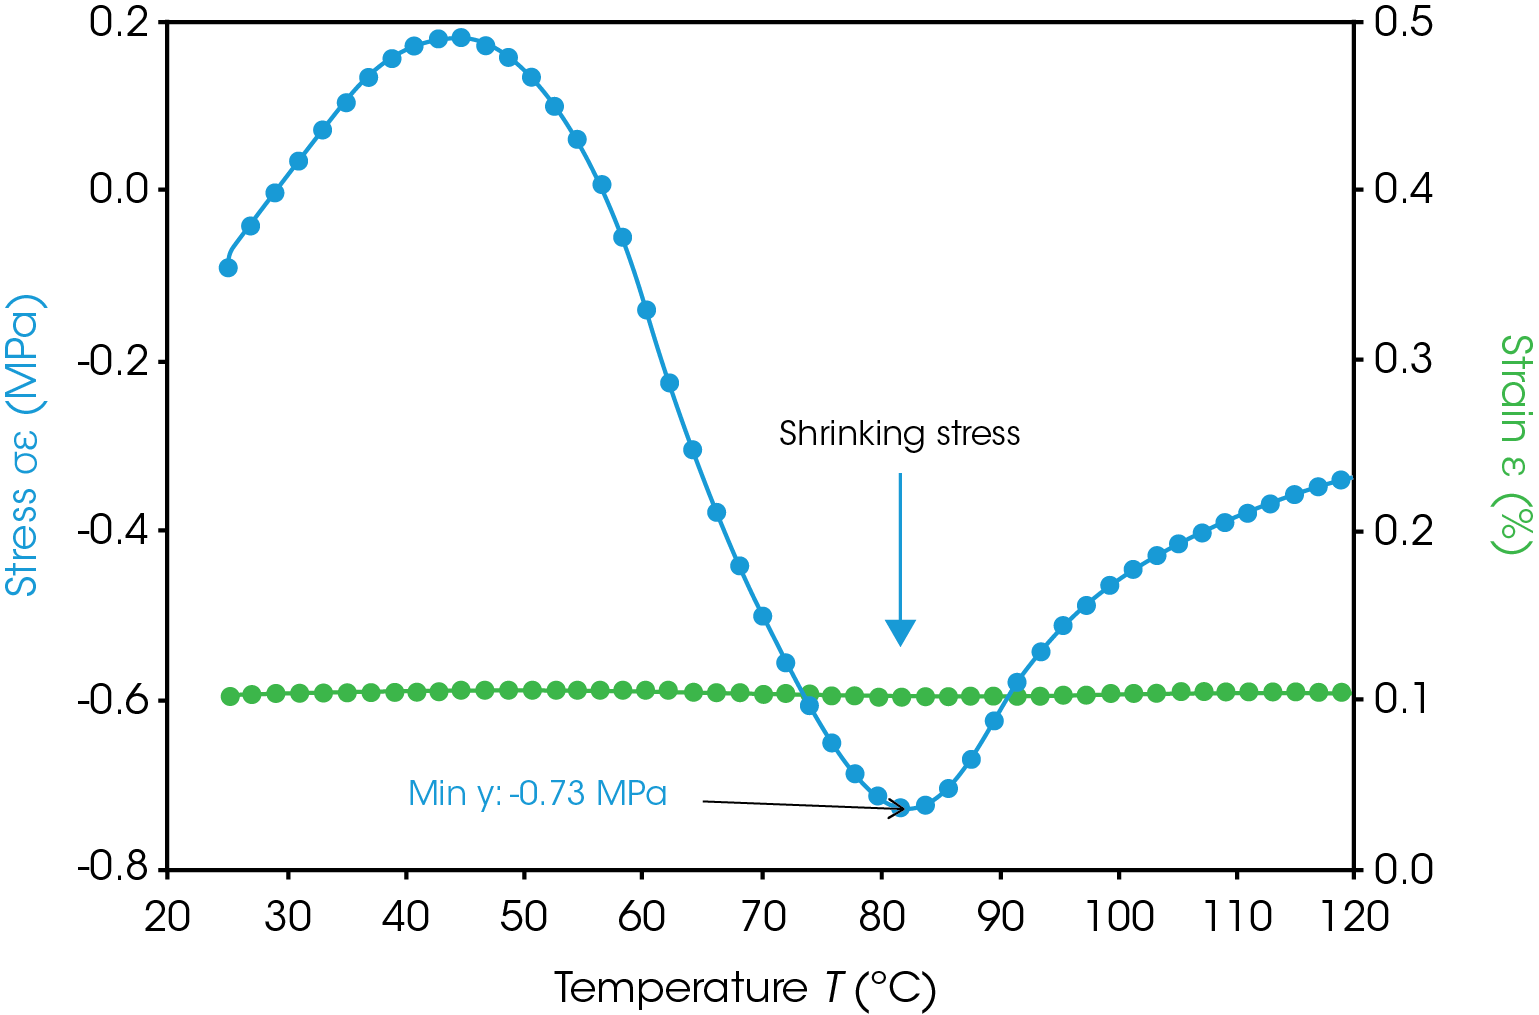
The tube shrinking force/stress is measured using an iso-strain temperature ramp method. A temperature ramp test is conducted from 25 °C to 120 °C with a heating rate of 3 °C/min. During the ramp, a constant strain of 0.1% is applied to the sample, and the change in shrinking stress, which is independent of sample size, is recorded as a function of temperature.

Results and Discussions
From a quick DSC temperature scan result (data not shown), it is observed that the glass transition temperature (Tg) of this tube sample is occurred at a temperature of 47 °C. Figure 1 shows the iso-force temperature ramp test result under a constant force of 0.1N. It can be seen that the sample undergoes a significant shrinkage when the test temperature is greater than 60 °C. The maximum dimension shrinkage under this test condition is observed to be greater than 30%.
Figure 2 shows the iso-strain temperature ramp test result. This test allows one to monitoring the amount of shrinking force/stress that is buildup with increasing temperature. Sample is held at a constant length with a fixed strain of 0.1%. The sample stress is monitored as a function of test temperature. In figure 2, a negative stress means sample is under tension and a positive stress means sample is under compression. At the beginning of the measurement, below the glass transition temperature (Tg), the sample undergoes a stress relaxation at 0.1% strain. So it is observed that there is a reducing tensile stress (less negative) with time/temperature. Also, the thermal expansion of the sample with increasing temperature results in the tensile stress reduce further and changing from the initial negative value to slightly positive. As the test temperature is further increased to above the material’s Tg, the sample attempts to shrink. However, since the length is held constant, the amount of shrinking stress (negative) is actively recorded. It is observed that the maximum buildup shrinking stress under this test condition is 0.73MPa.


Conclusion
The TA Instruments RSA G2 dynamic mechanical analyzer is a multi-functional instrument, which can be used to monitor the shrinkage of heat shrink tubing. The instrument is capable of quantitatively evaluating both the dimension shrinkage and the shrinking stress.
References
- ASTM 1204-14. Standard Test Method for Linear Dimensional Changes of Nonrigid Thermoplastic Sheeting or Film at Elevated Temperature. (2020)
- ASTM 2732-14. Standard Test Method for Unrestrained Linear Thermal Shrinkage of Plastic Film and Sheeting. (2020)
Acknowledgement
This paper was written by Dr. Tianhong (Terri) Chen, Principal Applications Support Scientist at TA Instruments.
Click here to download the printable version of this application note.

